The idea was to choose a subject that could be moved around and to take about eight photographs of it, each in a different kind of lighting. Either daylight, available light, available artificial light, to photographic lighting.
The main brief was to show the following qualities of the subject one at a time by means of lighting:
- SHAPE
- FORM
- TEXTURE
- COLOUR
Firstly I wanted to do a little more research on the definition of each of these words. The course notes gave one definition but I wanted a little more clarity before embarking on this exercise especially after struggling with this course so far.
Dictionary definition of each word:
- SHAPE:
- The particular physical form or appearance of something.
- An arrangement that is formed by joining lines together in a particular way or by the line or lines around its outer edge.
- The physical form or appearance of a particular person or thing.
- A person or object that you cannot see clearly because it is too dark, or because the person or object is too far away
- FORM:
- To begin to exist or to make something begin to exist.
- To make or be something.
- TEXTURE:
- The quality of something that can be decided by touch; the degree to which something is rough or smooth, or soft or hard.
- the character of a piece of writing or music.
- COLOUR:
- Red, blue, green, yellow, etc.
- The pleasant effect of a bright colour or of a lot of colours together.
- A substance, such as a paint or dye, which you add to something to give it a particular colour
- A pink colour in someone's face, often showing good health or showing feelings such as embarrassment or excitement.
Source (Cambridge Dictionaries on-line)
Using lighting to convey these meanings was going to be a challenge! I had looked at few fellow students' blogs for some inspiration and many had photographed ornaments and glass jugs and the like. All of which were very commendable and well shot. However, non really inspired me! Until I read the OCA newsletter and discovered Ghada Al Qassimi work. Ghada had been inspired to photograph some amazing pictures of her daughter OCA news Letter, which in turn prompted me to look at how I could use images of my daughter to fulfill the brief of this difficult assignment.
Some initial ideas are:
- Shape:
- Elodie (my daughter) on a swing or see-saw shot at low sun- perhaps silhouette?
- Elodie holding a toy, her coat, umbrella. Shot in the rain? with lighting behind her to show the shape of the object and her.
- Form:
- Elodie on the roundabout showing the volume of the subject, perhaps blurred from spinning.
- Elodie close-up.
- Texture:
- A close up of Elodie to show the texture of her skin and clothing. The lighting will need to be adjusted carefully as not to be too harsh.
- Elodie playing with a highly textured toy or with a log or stick. Or leaning on a tree.
- Colour:
- Elodie playing with the coloured balls at the play park with the lighting directed to the coloured balls.
- Elodie against our coloured garage door (textured multicoloured old paint). Perhaps she could be sitting playing with a toy (coloured, or beads) in a brightly coloured dress. Again lighting would need to be controlled well.
These will all be extremely difficult to shoot not only because of the difficulties with getting the lighting correct but also to take pictures of a two year old that just wants to go off and play!
Photograph 1: Shape
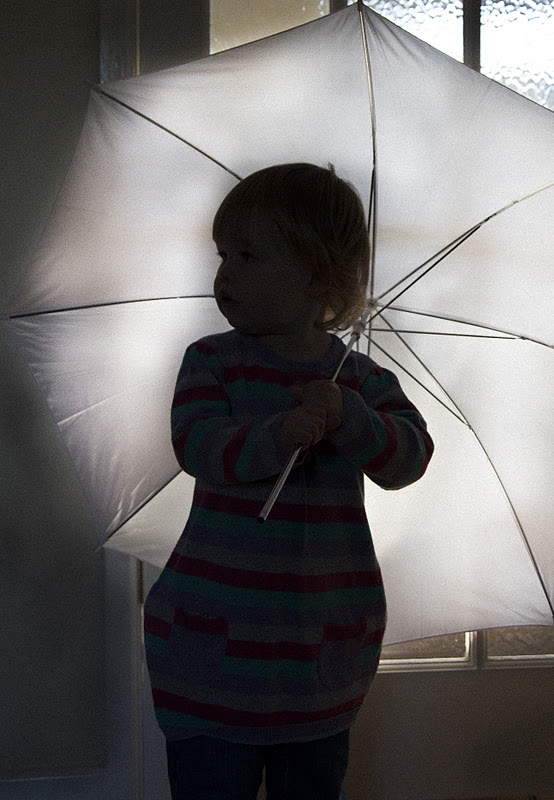 |
| Canon 5DMk II, Canon EF24-105mm f/4 L IS USM Lens, 35mm, f/4.0, 1/100s, ISO 400 |
For this first shot I set up a canon speedlite behind my daughter and behind the glass door and gave her a shoot through umbrella to hold. I spot metered for the light and used E-TTL (Evaluative-Through The Lens) flash.
Tutor Comments, Photograph 1:


Tutor Comments, Photograph 1:
The use of a photographic lighting umbrella diffuses the light, as it is intended. As you’ve reversed the traditional placement/direction it forms an interesting background, that is relatively evenly lit, almost like a lightbox. A profile shot of the head (90 degrees to the camera) would have shown more detail of the subject to the viewer, making a more distinctive focal point. A stronger back light (or extra exposure) would help to increase the contrast between body and umbrella too, although this could be tweaked on this version. I’d suggest cropping the top such that the distracting highlight to the right is removed, as it draws the eye away from the subject.
Cropped image:

I also captured this image of Elodie more in profile. However, she also turned the umbrella losing some of the interest in the image.

Photograph 2: Shape
 |
Canon 5DMk II, Canon EF24-105mm f/4 L IS USM Lens, 50mm, f/18.0, 1/160s, ISO 100
|
Another silhouette image. However, this time I used natural low level light with a little fill flash off camera again using E-TTL. I would have liked to move Elodie's head to block the sun a little more. However, as I moved she decided she didn't want to play on the see-saw anymore!
Tutor Comments, Photograph 2:
This is a more successful shot, even though it has perhaps less creativity than the first image. The layout and composition are simpler, you have a strong backlight with good radiation of shafts of light. The curves of the see-saw added to the curved railings and their shadows provide plenty of interest, without distracting attention away from the subject and the sun. Again the lack of a profile encourages the viewer to look into the shadowed face which takes us away from the intention of making the ‘shape’ the subject.
Photograph 3: Form
 |
| Canon 5DMk II, Canon EF24-105mm f/4 L IS USM Lens, 28mm, f/10.0, 1/160s, ISO 100 |
I used fill in flash in this image of Elodie on a swing shot directly into the bright evening sky to try and create form and depth in the image.
Tutor Comments, Photograph 3:
The use of low sunlight has created an excellent rendition of the forms: The ripples of clothing, scratches and reflections on the pole and chains, the roundness of the seat’s cage etc. The simplicity of the framing against the sky and the balanced exposure using flash have made all elements stand out against the sky. Whilst both highlights and shadows show good detail and colour. The placing of the subject on the lower thirds is good, as are the diagonals of the chains. My eye is drawn to the red pole at the top which is neither in the shot (wholly) nor cropped out. Is there any more in the original frame, maybe just to include the right-hand bracket?
Photograph 4: Form

 |
| Canon 5DMk II, Canon EF24-105mm f/4 L IS USM Lens, 105mm, f/7.1, 1/20s, ISO 1600 |
I used flash shot through a shoot through umbrella to soften the light and positioned it to the left side of Elodie to try and show form.
Tutor Comments, Photograph 4:
The use of sidelighting has accentuated the form of the rounded areas (legs and head). The hands are also quite well modelled. The use of the object (toy?) that she holds to her face does cover most of the face, which is a shame as her pose and expression are good. Try cropping out the knees, or darkening them a little, to see if you prefer the shot with the bright area of her face being more prominent?
Knees cropped out:

Photograph 5: Texture
 |
| Leica Camera AG M8, Carl Zeiss Biogon f/2.8 28mm Lens, 28mm, f/8.0, 1/180s, ISO 160 |
Again I used the bright natural light to show the texture of Elodie's hair and skin.
Tutors Comments, Photograph 5:
Capturing children engrossed with objects forms a ‘two point’ composition that is quite strong. It is also usually more successful than trying to get them to pose looking towards the camera. Her intense concentration is tangible. Textures of her clothing and hair are particularly well rendered. Even her skin shows finely detailed texture between highlight and shadow. It would have been nice to see more of the lower hand in the shot, as it has been truncated.
Different image arm not truncated as much. I prefer the lighting in the first image:

Photograph 6: Texture
 |
| Canon 5DMk II, Canon EF24-105mm f/4 L IS USM Lens, 105mm, f/4.0, 1/200s, ISO 100 |
I used flash mounted on the camera to try and show the texture of Elodie's skin, clothes and toy.
Tutors Comments, Photograph 6:
This is a good portrait with bags of colour, but is less successful than the previous one for two reasons: Strong sidelighting revealed light and shade of the texture on surfaces in image 5. We could see this clearly as we were a lot closer. In this shot we are further away, with more diffused lighting. The modelling of form is quite good, and the exposure has been controlled very well.
Photograph 7: Colour
 |
| Canon 5DMk II, Canon EF24-105mm f/4 L IS USM Lens, 40mm, f/5.6, 1/15s, ISO 100, -0.67ev |
I shot this image of Elodie against the door using a canon speedlite shot through a shoot through umbrella and added grain in photoshop.
The third image (on the swing) showed how a strong light from behind the camera, coupled with fill-in of shadows by flash or reflector, can produce highly saturated colours, merely by use of lighting. In this image we have vivid colours all over the picture, but the softer lighing hasn’t increased their saturation as much as in image 3. A harder choice of reflector (silvered, or direct flash) would enhance the colour rendition, but may not be sympathetic enough for portrait lighting.
Tutor Comments, Photograph 7:
Photograph 8: Colour
 |
| Canon 5DMk II, Canon EF24-105mm f/4 L IS USM Lens, 45mm, f/4, 1/160s, ISO 3200 |
I took this image in the London science museum and used the green light from the display to try and convey colour. To try and capture Elodie whilst moving around I needed to increase the ISO to 3200 and shoot at a large aperture and therefore was able to use a faster shutter speed.
This assignment was extremely difficult and in hindsight perhaps I should have chosen a different subject. One that didn't move about quite so much! However, I enjoyed trying different lighting techniques to try and convey the different tasks in this assignment. I also enjoyed taking these images of my daughter and hope it shows in the final pictures.
Tutor Comments, Photograph 8:
The image is a good shot of your daughter with her arm and face lit by the display. The rest of the background is dark enough not to be distracting. The shot is good, demonstrating the use of coloured light to change the colour of a subject, rather than using light to enhance the existing colour of a subject.This assignment was extremely difficult and in hindsight perhaps I should have chosen a different subject. One that didn't move about quite so much! However, I enjoyed trying different lighting techniques to try and convey the different tasks in this assignment. I also enjoyed taking these images of my daughter and hope it shows in the final pictures.